If you're an Admin, make sure the “Advanced Mode” button is on (bottom right corner of the screen, should turn blue when engaged), as this allows for much more customization of the post.
We'll address the rest of the fields available in the post creation form in order, starting from below the body field. (Title, Subtitle and Body fields are covered in a separate article.)

Additional search terms
This field is handy for adding terms you want available to your site search, but that you don't want appearing in the body or title. (Note: this does not apply to Google or other search engines, just the search for your site.)

Vertical tabs
A lot of the cool fields for posts can be found in what we call the vertical tabs below the body field. They are the stacked grey tabs right below the "additional search terms" field, beginning with Images and Custom URL, and ending with Publishing options.
Images
Click on the “Images” tab. Here you can either choose a file from your hard drive to upload (“Upload”), browse from existing images you've already uploaded to your website (“File browser”) or enter the URL of an online image (“Remote URL”).

Handy tip: the Remote URL option (top right of the upload field) is very handy if you're moving content from an old website to your new site, as you can simply copy the URL of the existing image and use this tool to "copy it" into your new site. This saves the trouble of downloading a copy and then re-uploading to the new site.
- Image formats supported: .JPEG, .JPG, .PNG, .GIF
- Recommended image resolution: 1200 X 1600
You can add multiple images to your post by using the "Add additional item" button. In some cases we may theme the site to show them in small thumbnails below the main image; in other cases we may theme them by post type to turn into a slideshow. The best thing you can do is to include all the images you need, and then reach out if the theme doesn't support them well so we can make adjustments.
Custom URL
By default, the URLs for your content are created by the system to be very search engine friendly, and are based on the post type and the words in the title (minus shorter words like "the," "and," "in," etc). So if you have a post with the title, "The Best Blog Post in the World," and it is of post type "blog," then your automatic URL will look like this (replacing our domain with yours, of course):
http://www.digitaldeployment.com/blog/best-blog-post-world

This is great for search engines, but maybe not so great if you want to advertise this blog post and make it memorable for people.
The good news is that you can have both! A great approach is to create the post and let the system make the automatic URL (remember, search engines love long URLs with good search terms in them!), then save it. Next, edit your post again, uncheck the box, and enter your shorter URL. (In this case, possibly just "best-blog").
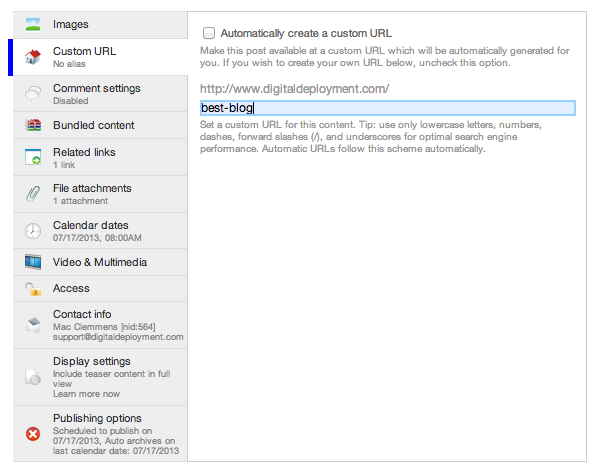
Now the system will know to use both of those URLs for the post - making search engines happy, but also making it easy for you to communicate the path to that post. It will display when visitors enter either the long or the short URL in their browser.
Comment settings
Comments are turned off on most post types by default. If you'd like to enable them on all posts of a specific type, then you should edit the post type itself and make that change in one place. (More on that in the articles about customizing post types.) However, if you just want to enable them on this one post (or disable them on this particular post, if they're enabled on the post type in general), this is the tab that allows you to do so.
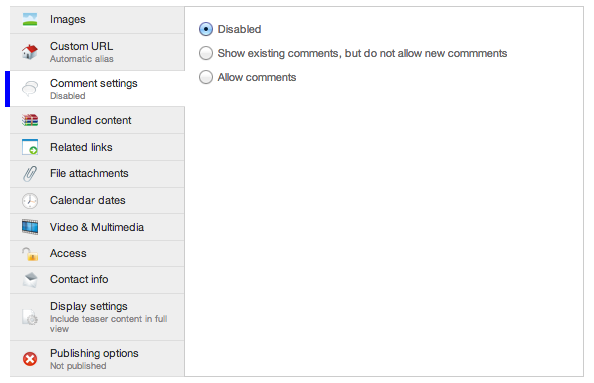
You can choose from Disabled, Show existing comments but do not allow new comments, or Allow comments. The second option is helpful if you had comments open but want to close the conversation.
Bundled content
Bundled Content allows the user to create links to content that is already created on the website. The easiest way to locate content you want bundled is to begin typing in the name of the post in the text bar, the system will do an auto search and show all content within the typed parameters. Bundled content will only appear to site visitors when they're looking at a "full-post view" of the post, not on teasers or Overviews.

Note: This field uses an auto complete field to search within the for already-existing posts by title. To use this, simply start typing part of a word you think is in the title of the post you're looking for.
Bundled content is used often for Bundle & Blast™ - the system we use for bundling content up and then blasting it out (handy for sending newsletters, updates to your members, etc.) There's more on that in the article about Bundle & Blast™, but this field can also be used to feature related content that you want visitors to see when reading this post. Things bundled using this field will appear below your post, and only on the full post view.
You can use the "Add another item" button (not pictured) to add additional bundled content.
Related Links
Related links is used to add a link to other websites. You can customize the display name for the link, as shown below:
Whatever is entered in the title field will appear to the visitor, but the link will click through to the URL you've pasted into the URL field. You can copy the URL into the Title field if you'd like the actual web address to display, but be careful doing that with really long, unwieldy URLs.
You can use the "Add another item" to add additional links.
File attachments
Use this field to upload documents, choose from existing documents on the website, or a document with its own URL. They will be displayed so that visitors can open and download these files.
Note: Don’t forget to label your file. Without a label the system will save the file but not allow it to be seen by the public. The label does not have to match the file name, and probably should not. Typically file attachments appear at the bottom of the post, or in the right sidebar, depending upon your theme. Handy tip: Labels with actionable text (eg, Download the PDF) are more likely to be clicked by users.
You can also link to your attached file within the body text. In this case, you may want to skip adding a title to the file attachment (as shown above) and instead let the attachment be hidden. Upload your file, then right mouse click on the file name (in the example above, mac-ideas.pdf). Copy the link location. Then, go up to the body text field of your post, find the content you'd like to link to the file, and use the Insert link tool to insert a link to the file.
Calendar dates
Post Date: Used to display the date of the post. For example, a news story or press release might use a post date. When migrating content from an old site, it's good practice to align this date with the original post date, if the content had one.
Tip: Often this function is used to sort posts on a landing page; by default, the most recent posts will appear at the top unless the sorting as been overridden.
Event Date: Used when there is an event on a specific date. By default, once the event date has passed the post will automatically be archived. (See publishing options for information on how to unarchive and how to turn off auto-archive.) Setting event dates will automatically make the post appear on the sitewide calendar.
Note: Calendar dates are set to archive after the event occurs. If you would not like the post to archive, you can manually set an archive date. Go to the “publishing options” tab in the bottom of your editor and uncheck the box that says “Automatically determine the archive date”. Once that is unchecked, a new field called “archive on:” will appear. Set the date, scroll down and save.
Video & Multimedia
Your website allows you to easily integrate videos posted to Youtube and Vimeo. To use the video field, simply visit the video in YouTube or Vimeo, then copy the URL of the video from your browser and paste it into the field in your site. (Note: do NOT copy the embed code, only the URL when viewing the video.)
The content management system will automatically generate the various embed codes for your visitors automatically. It will also generate a thumbnail of the video and overlay a play button. If you'd like to add a custom thumbnail, grab a screen capture of the part of the video you'd like to use, then upload it using the “Video custom thumbnail” link. To revert to the default thumbnail, simply edit the post and remove the image.
Access
To control who can see a post,
Contact info
This is an area that allows you to add contact information in a variety of ways. The contact info will typically appear to the right of your post when viewed in full display.
You can use the autocomplete field to add profiles that already exist on your site. There are many benefits to using profiles instead of embedding emails directly into posts ... one of which is that if the person gets married, changes their name, or you change your email addresses, you can change them once (in the profile) and not multiple times in a bunch of different posts.
If the person doesn't have a profile, you can enter their email address, phone number manually in the fields following.
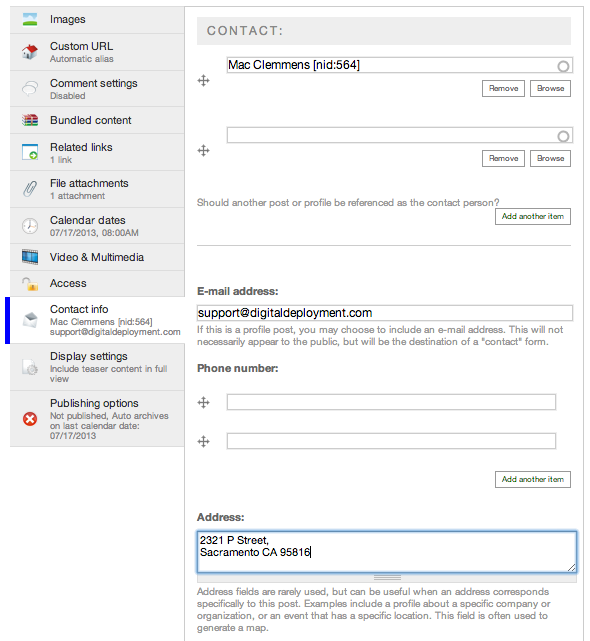
The address field will automatically generate a map link using Google maps, so be careful to use a "real" address here. (You can test it at www.maps.google.com if you want to be sure in advance that it maps correctly.)
Publishing options
If “published” is selected, the post will be visible to the public. If not, it will only be visible to users with the roles Editor, Site Admin or System Admins. Contributors, Members and Anonymous visitors will not be able to see it.
A note about unpublishing vs archiving:
Unpublished content keeps its navigation terms. So although something is unpublished, it will still remain on the landing page for the term(s) it is tagged to, even though the public won't be able to see it. Unpublished content is not available in search.
Archived content has its navigation terms stripped, thereby making it "disappear" from landing pages. It is still available in search, however, and the public can see archived content if they search for it.

You can leave a post unpublished and set a future publish date for it, or publish it upon save. Anyone with the role of Contributor is unable to publish their own content, and must have it first approved by and Administrator. (More on this in another article.)
The box for automatically determining the archive date relies on the settings for the post type. So if you have set your Announcement post type to automatically archive in six months, for example, this post would follow that timeframe and archive in six months. You can also uncheck the box and set an archive date manually on a post.
If you have not set Calendar dates on the post, it will use the post date as its date for determining archive status. If you have set calendar dates, and the "automatically determine archive date" box is checked, the post will archive when that calendar date passes. If unchecked, you can manually set the post's individual expiration date.


