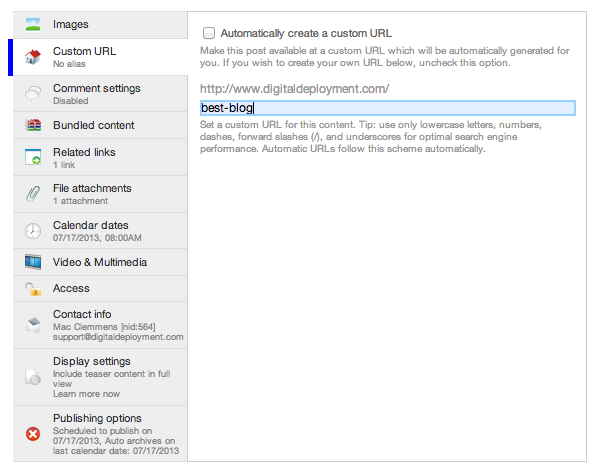
You can create custom URL aliases two ways: 1) for a post; or 2) for a navigation term.
Note: Custom URLs should not be added to Overviews. If you want a term landing page to have a custom URL, it should be added to the navigation term (option 2 below).
1) Custom URLs for Posts
By default, the URLs for posts are created by the system to be very search engine friendly, and are based on the post type and the words in the title (minus shorter words like "the," "and," "in," etc). So if you have a post with the title, "The Best Blog Post in the World," and it is of post type "blog," then your automatic URL will look like this (replacing our domain with yours, of course):
http://www.digitaldeployment.com/blog/best-blog-post-world

This is great for search engines, but maybe not so great if you want to advertise this blog post and make it memorable for people.
The good news is that you can have both! A great approach is to create the post and let the system make the automatic URL (remember, search engines love long URLs with good search terms in them!), then save it. Next, edit your post again, uncheck the box, and enter your shorter URL. (In this case, possibly just "best-blog").

Now the system will know to use both of those URLs for the post - making search engines happy, but also making it easy for you to communicate the path to that post. It will display when visitors enter either the long or the short URL in their browser.
2) URL Aliases for Navigation Terms
Note: Adding custom aliases to navigation terms can interfere with search engine optimization and can conflict with existing aliases and redirects. We recommend limiting their use or contacting us with your specific needs.
Similar to posts, URLs for navigation terms are created based on the name of that term, using hyphens for spaces. Any site editors or admins can create Custom URLs above, but only system admins can add/edit/delete URL aliases.
The first step to creating a URL alias for a navigation term is to identify the taxonomy term number. You can do this by going to the Commands menu > Edit navigation terms and clicking Edit next to the term you're going to add an alias for. You're not actually going to edit the term, but you will need to find the taxonomy term number in the URL on this page:

Make note of the taxonomy term number as you will need it for the next step.
To add the URL alias, click on Site building > URL aliases from the top black system administration bar on your site.

Click the tab for Add alias. Type the taxonomy term number in the first box and your desired alias into the second box. Click Create new alias.

If you're looking for information on how to create URL Redirects, we recommend reading Redirecting a Navigation Term.
Was this article helpful?
That’s Great!
Thank you for your feedback
Sorry! We couldn't be helpful
Thank you for your feedback
Feedback sent
We appreciate your effort and will try to fix the article